How to Make Glass Photo Jewelry - Pendant Tray
How to Make a Glass Photo Pendant


I recommend following our tutorials over any other tutorials you may have read or tried, especially when using Glamour Seal and Glamour Glaze products to avoid potential issues. This system works exceptionally well and will save you time and money by avoiding the costly mistakes I've already made and learned from. The right combination of products makes it goof-proof.
SHOPPING LIST
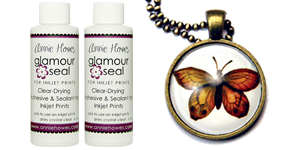
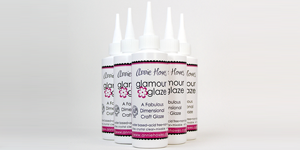
Glamour Seal or Glamour Glaze
Glamour FX(TM) Glass Shapes
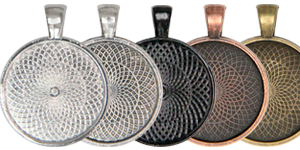
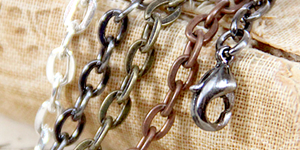
Pendant trays or other settings
Decorative Papers, or your own prints*(see note below)
Cutting Blade & Surface
Also sold in convenient kits.

Feel free to explore your own smooth surface decorative scrapbook papers for the papers provided. I do recommend if you use your own prints to use color laser prints or inkjet prints on matte paper using Glamour Seal to prevent the inkjet prints from smearing.
Step 1
Prepare your glass by wiping with a lint free cloth. Be sure your hands are free of lotions which may prevent the Glamour Seal from adhering to the glass.
Step 2
Select the untrimmed decorative paper you’d like to use. Set aside. Take your clean glass tile, and apply a thin coat of Glamour Seal. Working quickly (Glamour Seal dries quickly), place the glass tile Glamour Seal side down on the patterned side of your decorative paper. You will be able to see through the glass to the patterned paper.
Step 4
Press the glass down onto the paper with your thumb using a table top or other flat surface underneath the paper. Use even, firm pressure. This removes any air bubbles in the Glamour Seal. If you see excess Glamour Seal ooze from the edge of the glass, just just wipe it off.
Allow the Glamour Seal to dry. This normally takes about 5 minutes, but longer is better in more humid weather. Dry them first glass-side-up for a couple of minutes, then flip them over so the paper is facing up and exposed to the air.
Step 5
Using a fresh, sharp X-acto blade (I use a #11 blade), put the glass tile paper-side down onto a cutting surface, such as a self-healing mat. Carefully trim the excess paper from the edges while pressing firmly down on the glass tile. I find if I use light pressure on my first cut and then slightly heavier pressure on the second cut I can get a nice clean cut. I also hold my blade at a slight angle (inward) so the cut is just inside the edge of the glass tile.
Should the paper on the glass need trimming, I find a pair of scissors works well to snip off any excess. Alternatively, you may prefer to use the X-acto blade using the same method indicated for the square tiles.
Scrape the edges carefully with the edge of the blade to remove any excess Glamour Seal.
Step 6
Apply a thin coat of Glamour Seal to the back side of the pendant. You want enough to come into contact with the pendant tray. Too much Glamour Seal will ooze up the sides and not enough will not keep the glass inside the setting. Using too much may also cause your paper to become cloudy. This will eventually clear up, but no point in using too much.
Notes:
If you are using inkjet prints, you must use Glamour Seal to avoid smearing the inks. Your prints must be thoroughly dry which may take between 1 and 24 hours.
USING YOUR OWN PRINTS: It's best to print on matte paper, 90# or cover weight papers, not recommended for regular printer paper, glossy paper, and lab prints, such as those provided by photo processing centers. Both Glamour Glaze and Glamour Seal work great on decorative papers such as Chiyogami, Italian, and scrapbook papers.
* With Glamour Seal, when making glass pendants, the paper with the best results when tested using a Canon inkjet printer was the Epson Ultra Premium Presentation Paper (matte) 51 lb, which can be used with all inkjet printers.
TROUBLESHOOTING:
Sometimes, there are unwanted results. Let’s talk about what happened and why, and what we can do to fix them. There is always a solution, and all of the problems, every single one of them, can be easily answered and resolved.
Problem: Silvery spots on your paper under the glass.
Answer: Silvery spots are nothing more than trapped air. This is the number one problem most people encounter. Technique is the primary cause of silvery spots, along with using the wrong paper.
Papers: Did you use any of the following papers?
-
Anything with a texture (ie. Glitter, embossing, etc.)
-
All prints from a printing service (lab prints)
-
Glossy paper
-
Dye-sublimation prints and papers
-
Fast-drying papers
-
Paper specifically for photo printing
Problem: The Glamour Seal is still white and drying slowly.
Answer 1: Incorrect paper type used. Glamour Seal is best used on matte paper, 90# or cover weight. It's not recommended for regular printer paper, glossy paper, and lab prints, such as those provided by photo processing centers. Glamour Seal works great on decorative papers such as Chiyogami, Italian, and scrapbook papers. The paper with the best results when I tested using a Canon inkjet printer was the Epson Ultra Premium Presentation Paper (matte) which can can be used with all inkjet printers. The exception to this is when sealing paper prior to using Luxe Resin, and glossy paper is OK.
Answer 2: Insufficient drying time. More time is needed between gluring the paper to the glass and moving to the next step. You must allow the product to dry thoroughly otherwise you lengthen the drying time significantly. Additionally, humid environments and rainy days can affect the drying time.
Answer 3: Too much Glamour Seal was used to glue the glass into the pendant tray. If your image was clear until gluing into the pendant tray, then use less Glamour Seal in the pendant tray, or try Glamour Stickies for instantly dry results.
Problem: The ink from my inkjet print is smearing.
Answer: If you used the correct paper, this is because the ink on your prints was not allowed to dry thoroughly to begin with. The prints from inkjet printers must dry before using them in any application. If the ink smears when you touch it, allow it to dry until the ink does not smear to the touch. Please check with your printer manufacturer to determine the drying time of the prints. Additionally, humid environments and rainy days can affect the drying time of your inkjet prints.
Other possible causes for smearing ink include using glossy prints, or other papers where the adhesive cannot dry, using too much adhesive, or using emulsion prints, such as those from lab processing centers. Other possible causes include using other products to seal your paper which are unnecessary since Glamour Seal is both an adhesive and a sealant.
Problem: Excessive bubbles/frothing is occurring.
Answer: This is typically caused by glossy photo papers that are marketed as “fast-drying” or “quick-drying”, most commonly found on glossy papers. These papers are coated with a film that bubbles profusely when in contact with any liquid. Avoid using these papers.
Click here for more information on Glamour Seal.
If you're having a problem and you don't see it addressed here, please feel free to contact us.
Customer Favorites